
This post focusses on the implementation of VXLAN on two FortiGate firewalls. Fortinet offers various options for getting this to work, but based on my experience, they don’t always work as documented.
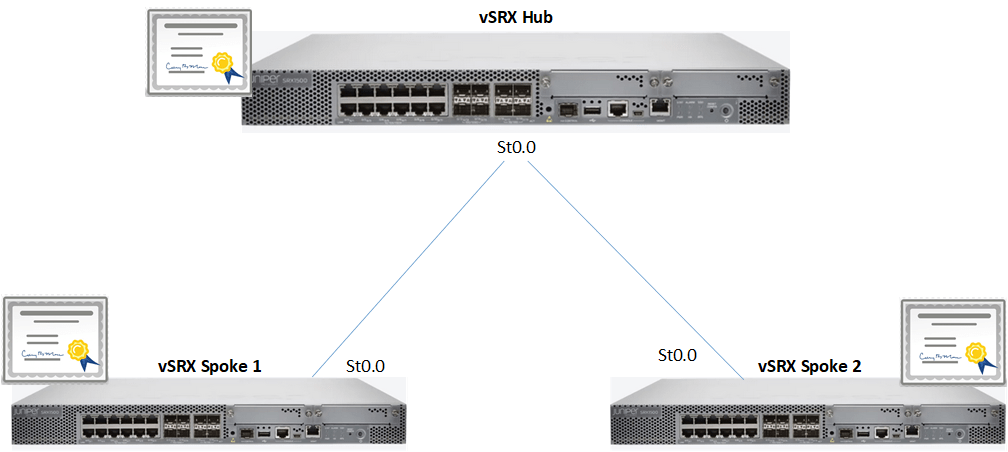
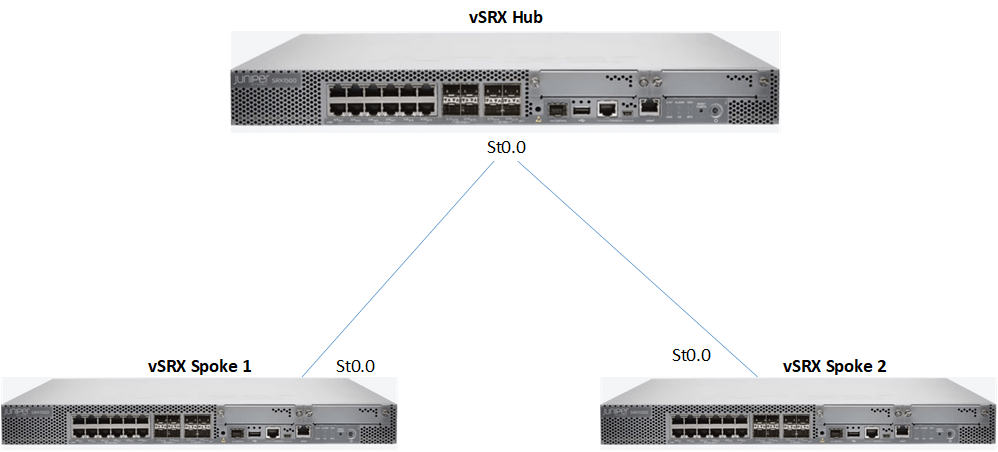
The FortiGate VXLAN configuration shown in this article is the setup that I have gotten to work in multiple environments. This setup focusses on routing the VXLAN traffic over an SD-WAN with multiple site to site IPsec VPNs tunnels. The setup can be seen in the image above.
To configure the VXLAN over SD-WAN setup we need to plan the following:
- WAN IP addresses (Public IP addresses or Private IP addresses)
- Loopback IP addresses (as VXLAN Interface)
- SD-WAN rules (Is there a preferred link or traffic types to be handled differently?)
- Firewall Policies (Traffic flow between sites)
The steps to configure this setup are outlined below:
Configure WAN Links - FortiGate 1
config system interface
    edit "wan1"
        set vdom "root"
        set ip 10.10.11.2 255.255.255.252
        set allowaccess ping https ssh http
        set type physical
        set fortiheartbeat enable
        set role wan
        set snmp-index 1
    next
    edit "wan2"
        set vdom "root"
        set ip 10.10.12.2 255.255.255.252
        set allowaccess ping https ssh http
        set type physical
        set role wan
        set snmp-index 2
    next

This example uses two MPLS links with private IP addressing. The same approach can be taken using public IP addresses.
Configure WAN Links - FortiGate 2
edit "wan1"
set vdom "root"
set ip 10.10.11.1 255.255.255.252
set allowaccess ping https ssh http fabri
set type physical
set role wan
set snmp-index 3
next
edit "wan2"
set vdom "root"
set ip 10.10.12.1 255.255.255.252
set allowaccess ping https ssh http
set type physical
set role wan
set snmp-index 4
nextConfigure LAN IP - FortiGate 1
edit "lan"
set vdom "root"
set ip 192.168.3.99 255.255.255.0
set allowaccess ping https ssh http fgfm capwap
set type hard-switch
set stp enable
set role lan
set snmp-index 5
next
This IP is used to route non-VXLAN traffic over the SD-WANConfigure LAN IP - FortiGate 2
edit "lan"
set vdom "root"
set ip 192.168.100.99 255.255.255.0
set allowaccess ping https ssh http fgfm fabric
set type hard-switch
set stp enable
set role lan
set snmp-index 11
nextConfigure the two VPN tunnels using the FortiGate Wizard - FortiGate 1
config vpn ipsec phase1-interface
edit "vpn1"
set interface "wan1"
set peertype any
set net-device disable
set proposal aes128-sha256 aes256-sha256 aes128-sha1 aes256-sha1
set comments "VPN: vpn1 (Created by VPN wizard)"
set wizard-type static-fortigate
set remote-gw 10.10.11.1
set psksecret ENC lahdfahflajfadsf
next
edit "vpn2"
set interface "wan2"
set peertype any
set net-device disable
set proposal aes128-sha256 aes256-sha256 aes128-sha1 aes256-sha1
set comments "VPN: vpn2 (Created by VPN wizard)"
set wizard-type static-fortigate
set remote-gw 10.10.12.1
set psksecret ENC oosajdfohiadjoafdsa
next
end
config vpn ipsec phase2-interface
edit "vpn1"
set phase1name "vpn1"
set proposal aes128-sha1 aes256-sha1 aes128-sha256 aes256-sha256 aes128gcm aes256gcm chacha20poly1305
set comments "VPN: vpn1 (Created by VPN wizard)"
set src-addr-type name
set dst-addr-type name
set src-name "vpn1_local"
set dst-name "vpn1_remote"
next
edit "vpn2"
set phase1name "vpn2"
set proposal aes128-sha1 aes256-sha1 aes128-sha256 aes256-sha256 aes128gcm aes256gcm chacha20poly1305
set comments "VPN: vpn2 (Created by VPN wizard)"
set src-addr-type name
set dst-addr-type name
set src-name "vpn2_local"
set dst-name "vpn2_remote"
next
end
Once the VPN tunnels are created, I assign IP addresses to them for use in the SD-WAN health checks.Configure the two VPN tunnels using the FortiGate Wizard - FortiGate 2
config vpn ipsec phase1-interface
edit "VPN1"
set interface "wan1"
set peertype any
set net-device disable
set proposal aes128-sha256 aes256-sha256 aes128-sha1 aes256-sha1
set comments "VPN: VPN1 (Created by VPN wizard)"
set wizard-type static-fortigate
set remote-gw 10.10.11.2
set psksecret ENC aoklsdhflaskfhaolsdk
next
edit "VPN2"
set interface "wan2"
set peertype any
set net-device disable
set proposal aes128-sha256 aes256-sha256 aes128-sha1 aes256-sha1
set comments "VPN: VPN2 (Created by VPN wizard)"
set wizard-type static-fortigate
set remote-gw 10.10.12.2
set psksecret ENC kjfhedaohfaoawddas
next
end
config vpn ipsec phase2-interface
edit "VPN1"
set phase1name "VPN1"
set proposal aes128-sha1 aes256-sha1 aes128-sha256 aes256-sha256 aes128gcm aes256gcm chacha20poly1305
set comments "VPN: VPN1 (Created by VPN wizard)"
set src-addr-type name
set dst-addr-type name
set src-name "VPN1_local"
set dst-name "VPN1_remote"
next
edit "VPN2"
set phase1name "VPN2"
set proposal aes128-sha1 aes256-sha1 aes128-sha256 aes256-sha256 aes128gcm aes256gcm chacha20poly1305
set comments "VPN: VPN2 (Created by VPN wizard)"
set src-addr-type name
set dst-addr-type name
set src-name "VPN2_local"
set dst-name "VPN2_remote"
next
end
The steps above configured the WAN and LAN IP addressing and configured two site to site IPsec VPNs. The next step adds the VPN tunnels to the SD-WAN setup. The configurations for this would be identical on FortiGate 1 and 2. I use the health checks to ensure a seamless failover in the event of a link failure.
config system virtual-wan-link
    set status enable
    config members
        edit 1
            set interface "vpn1"
        next
        edit 2
            set interface "vpn2"
        next
    end
    config health-check
        edit "VPN1"
            set server "1.1.1.1"
            set members 1
        next
        edit "VPN2"
            set server "1.1.2.1"
            set members 2
        next
    end
Once the SD-WAN is configured, testing should be done to ensure LAN traffic is being routed as expected. This helps to ensure that everything is setup properly before proceeding with the VXLAN configurations.
Configure Loopback Interface for use with the VXLAN Tunnel - FortiGate 1
    edit "Lo1"
        set vdom "root"
        set ip 1.1.1.4 255.255.255.255
        set allowaccess ping https http
        set type loopback
        set role lan
        set snmp-index 9
    next
Configure Loopback Interface for use with the VXLAN Tunnel - FortiGate 2
edit "Lo1"
set vdom "root"
set ip 1.1.1.3 255.255.255.255
set allowaccess ping https http
set type loopback
set role lan
set snmp-index 15
nextConfigure the VXLAN Interface and Bind it to the loopback interface - FortiGate 1
config system vxlan
edit "vxlan1"
set interface "Lo1"
set vni 10
set remote-ip "1.1.1.3"
next
end
The remote IP is set to the IP of the looback interface of Fortigate 2.Configure the VXLAN Interface and Bind it to the loopback interface - FortiGate 2
config system vxlan
edit "vxlan1"
set interface "Lo1"
set vni 10
set remote-ip "1.1.1.4"
next
endCreate a software switch with the VXLAN interface and its physical LAN port. In this case, lAN1. - Fortigate 1
config system switch-interface
edit "local1"
set vdom "root"
set member "lan1" "vxlan1"
next
end
This allows traffic to flow between the physical port and the VXLAN tunnel.
Create a software switch with the VXLAN interface and its physical LAN port. In this case, Port1. - Fortigate 1
config system switch-interface
    edit "local1"
        set vdom "root"
        set member "vxlan1" "port1"
    next
end
Configure firewall policies to allow traffic over the SD-WAN from both the LAN and SD-WAN - FortiGate 1
config firewall policy
edit 4
set name "Lan_to_SDWAN"
set srcintf "lan"
set dstintf "virtual-wan-link"
set srcaddr "all"
set dstaddr "all"
set action accept
set schedule "always"
set service "ALL"
set fsso disable
next
edit 3
set name "VXLAN_to_SDWAN"
set srcintf "Lo1"
set dstintf "virtual-wan-link"
set srcaddr "all"
set dstaddr "all"
set action accept
set schedule "always"
set service "ALL"
set fsso disable
next
edit 5
set name "SDWAN_to_VXLAN"
set srcintf "virtual-wan-link"
set dstintf "Lo1"
set srcaddr "all"
set dstaddr "all"
set action accept
set schedule "always"
set service "ALL"
set fsso disable
next
end
In this example the LAN was allowed to access the SDWAN, but no return traffic was allowed. The VXLAN was allowed to send and receive traffic over the SD-WAN.Configure firewall policies to allow traffic over the SD-WAN from both the LAN and SD-WAN - FortiGate 2
config firewall policy
edit 2
set name "VXLAN_TO_SDWAN"
set uuid c2874aa8-c8d5-51eb-f91a-6d52b4f9025b
set srcintf "Lo1"
set dstintf "virtual-wan-link"
set srcaddr "all"
set dstaddr "all"
set action accept
set schedule "always"
set service "ALL"
next
edit 3
set name "SDWAN_TO_VXLAN"
set uuid d6924f16-c8d5-51eb-3912-558ed835cc47
set srcintf "virtual-wan-link"
set dstintf "Lo1"
set srcaddr "all"
set dstaddr "all"
set action accept
set schedule "always"
set service "ALL"
next
edit 4
set name "Lan_to_SDWAN"
set srcintf "lan"
set dstintf "virtual-wan-link"
set srcaddr "all"
set dstaddr "all"
set action accept
set schedule "always"
set service "ALL"
set fsso disable
next
endIt should be noted that for testing and troubleshooting purposes, I add an IP to the software switch created when binding the VXLAN tunnel to the LAN port. This helps test traffic flow between firewalls to ensure that its working properly before including additional LAN devices. This configuration can be seen below for FortiGates 1 and 2 respectively.
FortiGate 1
    edit "local1"
        set vdom "root"
        set ip 192.168.2.2 255.255.255.0
        set allowaccess ping https ssh http
        set type switch
        set snmp-index 8
    next

FortiGate 2
    edit "local1"
        set vdom "root"
        set ip 192.168.2.1 255.255.255.0
        set allowaccess ping https ssh http
        set type switch
        set snmp-index 14
    next
Your VXLAN tunnel should now be up and passing traffic. I know this was a long blog but I wanted to ensure that I captured all the steps properly so that there would be no questions about the setup.
The original guide I used as a base for this content can be found here.
Do you have any questions or comments? Let me know in the comments below:


Pretty niuce post. Ijust stumbled upon your blog and wanted to saay
that I have truly enjoyed surfing around your blog posts.
After all I’ll be subscribing too your rss feed and I hope you write again very soon!
Your method of explaining everything in this post is in fact fastidious, all can without difficulty
know it, Thanks a lot.
I have one vFGT with only one interface in the cloud, so how to deal with such situation?
Good day,
Can you send more details to my inbox, [email protected] or fill out the contact us form?
Thanks
hi, Thank you for this. I did not understand how Encryption is working. what IP address groups did you configure in phase 2?
I managed to make 2 vlans working via VXLAN using the original link but would like to add the encryption