
By the end of this blog you should be able to successfully configure Juniper’s ADVPN using SRX firewalls. This blog builds on my previous post: JUNIPER’S HUB AND SPOKE VPN: HOW CONFIGURE A POINT-TO-MULTIPOINT VPN USING JUNIPER SRX DEVICES. The IP settings and basic network setup, including zones, are the same for all network devices. I recommend you review that article before reading this one. This article will focus on transitioning from the point-to-multipoint VPN to Juniper’s ADVPN setup.
What is ADVPN (Auto Discovery VPN) ? Simply put, it’s a way for the Hub SRX to dynamically inform spokes about better traffic paths between spokes, allowing them to form on demand VPN tunnels between them. More details about how this works will be given as we explain the various changes needed to facilitate this setup.
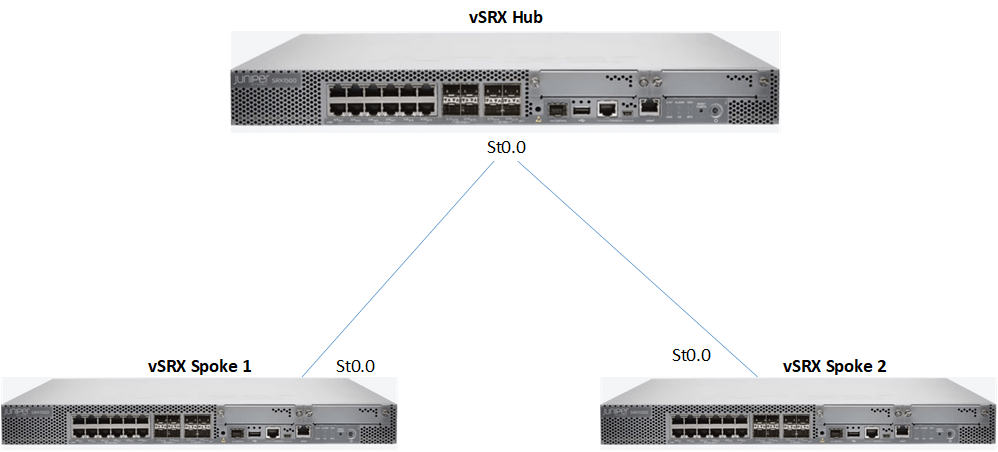
Multipoint Interfaces
Multipoint Interfaces: In the previous setup, only the hub needed a point-to-multipoint interface configured on the st0 interface to facilitate terminating multiple connections. In this setup, the spokes also need to have point-to-multipoint st0 interfaces because tunnels can be dynamically established to any other spoke.
Hub:
set interfaces st0 unit 0 multipoint
set interfaces st0 unit 0 family inet address 10.25.0.3/24
Spoke:
set interfaces st0 unit 0 multipoint
set interfaces st0 unit 0 family inet address 10.25.0.2/24
Dynamic Routing
Dynamic Routing: Previously static routing was used for the hub and spoke VPN topology. This setup requires OSPF to facilitate dynamic routing between SRX devices. This allows for the routing topology to be dynamically updated as shortcut tunnels and created and deleted on the network. When the st0 interfaces are added to OSPF we need to specify that they are P2MP (point-to-multipoint) interfaces and that dynamic neighbors can be formed. This configuration is the same for both hub and spoke:
HUB and Spoke Configs:
set protocols ospf area 0.0.0.0 interface st0.0 interface-type p2mp
set protocols ospf area 0.0.0.0 interface st0.0 dynamic-neighbors
set protocols ospf area 0.0.0.0 interface lo0.0 passive
Policies
Policies: It should be noted that if no policies are created to allow the traffic, it will be denied. We need to ensure that firewall policies are created to allow the traffic to flow as necessary when ADVPN tunnels are created. As noted in the previous blog, we allowed all traffic using the default-permit policy for the purposes of this lab.
PKI / Certificate Setup
PKI: Because security is at the heart of Juniper’s approach to the ADVPN setup, certificates are used to validate the identity of both hubs and spokes before VPN connections can be formed. In order to do this, an external Certificate Authority (CA) needs to be configured on the SRX. I used a Microsoft CA in my lab. The details about configuring a certificate authority on Windows server is beyond the scope of this blog but further information can be found here. A certificate also needs to be signed for each SRX and imported into the devices. The steps to accomplish this are:
- Create a CA profile
- Generate a key pair
- generate a CSR tied to the certificate ID referenced in the key pair
- Export and Sign the Cert using a CA (auto enrollment can also be used)
- Import and install the certificate
- Import and Install the CA certificate
CA Profile:
set security pki ca-profile DC2019 ca-identity jeremy.com
set security pki ca-profile DC2019 revocation-check disable
Hub:
request security pki generate-key-pair certificate-id vSRX-Hub
request security pki generate-certificate-request domain-name jeremy.com subject "O=jeremy,CN=vsrxhub" filename /var/tmp/vsrxhub.csr certificate-id vSRX-Hub
request security pki local-certificate load certificate-id vSRX-Hub filename vsrxhub.pem
request security pki ca-certificate load ca-profile DC2019 filename dc2019.pem
Spoke:
request security pki generate-key-pair certificate-id vSRX-s1
request security pki generate-certificate-request domain-name jeremy.com subject "O=jeremy,CN=vxsrx-s1,CN=spoke
" filename /var/tmp/vsrxspoke1.csr certificate-id vSRX-s1
request security pki local-certificate load certificate-id vSRX-s1 filename vsrxspoke1.pem
request security pki ca-certificate load ca-profile DC2019 filename dc2019.pem
IKE Configurations
IKE Configuration: ADVPN can only use IKEv2 in its setup. When setting up the IKE settings, the authentication method needs to be set to rsa-signatures which allows for referencing the certificate details. The IKE policy also references the local certificate that was previously created. I have bolded the changes in the IKE parameters that are needed to facilitate Juniper’s ADVPN setup in the examples to follow.
Hub IKE Settings: The hub’s configuration for the IKE gateway is different from the configurations on the spokes. Because the hub doesn’t know which spokes will be connecting, multiple fields in the certificate can be used to validate spokes’ identities. The remote identity is set to dynamic and a wildcard is used to match the fields in the spoke’s certificate. Multiple fields can be used, but I used only one in my example setup. The user type also needs to be set to group-ike-id.
set security ike proposal ike-lab authentication-method rsa-signatures
set security ike proposal ike-lab dh-group group2
set security ike proposal ike-lab authentication-algorithm sha1
set security ike proposal ike-lab encryption-algorithm 3des-cbc
set security ike proposal ike-lab lifetime-seconds 1800

set security ike policy ike-lab-pol mode main
set security ike policy ike-lab-pol proposals ike-lab
set security ike policy ike-lab-pol certificate local-certificate vSRX-Hub
set security ike gateway spoke1 ike-policy ike-lab-pol

set security ike gateway spoke dynamics distinguished-name wildcard CN=spoke
set security ike gateway spokes dynamic ike-user-type group-ike-id
set security ike gateway spokes dead-peer-detection
set security ike gateway spokes local-identity distinguished-name
set security ike gateway spokes external-interface ge-0/0/0
set security ike gateway spokes advpn partner disable
set security ike gateway spokes version v2-only
As seen above, to facilitate ADVPN, the hub configuration needs to specify that ADVPN partner is disabled. This means that the suggester role remains enabled by default. This allows the hub to suggest shortcut tunnels to spokes when it sees better traffic paths for them. Both hubs and spokes are set to use their distinguished name in the certificate as their local identity. The gateway version also needs to be explicitly configured to IKEv2.
Spoke IKE Settings: The spokes have the IP of the hub programed in the IKE gateway settings to allow them to initiate the VPN connections. The remote identity of the hub is configured to exactly match the certificate details of on the hub. Similar to the hub, the authentication method has changed to RSA signatures.
To facilitate ADVPN, the spoke configuration needs to specify that ADVPN suggester is disabled. This means that the spokes function as partners and will respond to suggestions. It should be noted that this setup can even work is one site is behind NAT. If both sites are behind NAT however, shortcut tunnels cannot be established. The IKE settings here also need to specify V2 only.
We can optionally configure idle time and idle-threshold timers if we want to change the default settings for tunnel creation and deletion. By default a tunnel will last indefinitely if traffic is flowing above the thresholds. By default, if traffic drops below 5 packets per seconds for 300 seconds then the tunnel will be automatically terminated:
set security ike proposal ike-lab authentication-method rsa-signatures
set security ike proposal ike-lab dh-group group2
set security ike proposal ike-lab authentication-algorithm sha1
set security ike proposal ike-lab encryption-algorithm 3des-cbc
set security ike proposal ike-lab lifetime-seconds 1800

set security ike policy ike-lab-pol mode main
set security ike policy ike-lab-pol proposals ike-lab
set security ike policy ike-lab-pol certificate local-certificate vSRX-s1

set security ike gateway hub ike-policy ike-lab-pol
set security ike gateway hub address 192.168.10.3
set security ike gateway hub dead-peer-detection
set security ike gateway hub local-identity distinguished-name
set security ike gateway hub remote-identity distinguished-name container O=jeremy,CN=vsrxhub
set security ike gateway hub external-interface ge-0/0/0
set security ike gateway hub advpn suggester disable
set security ike gateway hub advpn partner idle-time 60
set security ike gateway hub advpn partner idle-threshold 5
set security ike gateway hub version v2-only
Juniper ADVPN Testing
Verification/Testing: After sending traffic between both spokes, a shortcut tunnel was suggested by the hub and formed by the spokes. I have bolded the interesting parts of the output showing the initiator and differences in IKE details. The output also shows that both peers also established an OSPF relationship via the new VPN tunnel.
root@vsrxspoke1> show security ike sa detail 192.168.10.1
IKE peer 192.168.10.1, Index 7229000, Gateway Name: hub
  Auto Discovery VPN:
   Type: Shortcut, Local Capability: Partner, Peer Capability: Partner
  Role: Initiator, State: UP
  Initiator cookie: 2e4b18a0f5413ee2, Responder cookie: bfd1fca0350ea60b
  Exchange type: IKEv2, Authentication method: RSA-signatures
  Local: 192.168.10.2:500, Remote: 192.168.10.1:500
  Lifetime: Expires in 1761 seconds
  Reauth Lifetime: Disabled
  IKE Fragmentation: Enabled, Size: 576
  Remote Access Client Info: Unknown Client
  Peer ike-id: O=jeremy, CN=vsrx-s2, CN=spoke
  AAA assigned IP: 0.0.0.0
  Algorithms:
   Authentication        : hmac-sha1-96
   Encryption            : 3des-cbc
   Pseudo random function: hmac-sha1
   Diffie-Hellman group  : DH-group-2
  Traffic statistics:
   Input  bytes  :                 2571
   Output bytes  :                 2578
   Input  packets:                    6
   Output packets:                    6
   Input  fragmentated packets:       4
   Output fragmentated packets:       4
  IPSec security associations: 2 created, 0 deleted
  Phase 2 negotiations in progress: 1

    Negotiation type: Quick mode, Role: Initiator, Message ID: 0
    Local: 192.168.10.2:500, Remote: 192.168.10.1:500
    Local identity: O=jeremy, CN=vxsrx-s1, CN=spoke
    Remote identity: O=jeremy, CN=vsrx-s2, CN=spoke
    Flags: IKE SA is created


root@vsrxspoke1> show ospf neighbor
Address          Interface              State           ID               Pri  Dead
10.25.0.1        st0.0                  Full            10.10.1.1        128    36
10.25.0.3        st0.0                  Full            10.10.3.1        128    36
This blog gave a high-level overview of what is needed for Juniper’s ADVP setup. If you need to dig deeper, you can look at Juniper’s guide here: Auto Discovery VPNs | Junos OS | Juniper Networks
Feel free to let me know if you would like any information added to the blog in the comments below:

0 Comments